


DIY Colorful Computer Keyboard

Between my job and my personal life, I spend a lot of time on the computer every day. A LOT. So much that I really need my workspace to be cheerful, fun, and inspiring. A plain old black keyboard like this just doesn't fit the bill. But what's a girl to do?
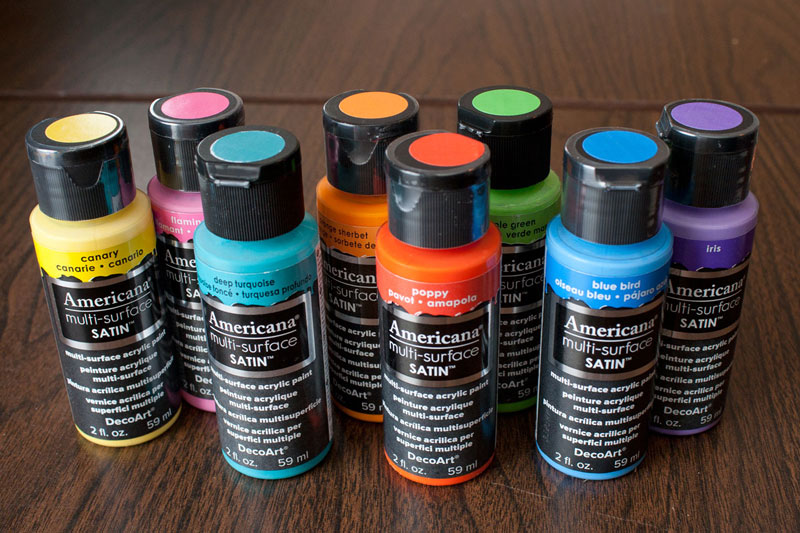
I've been going crazy lately with the new Americana Multi-Surface Satin Paints from DecoArt, because they are so easy to use and work on just about any surface you can imagine, including plastic. I had some sitting on my desk the other day, near my keyboard, and I thought... Could I? Should I? Yes!
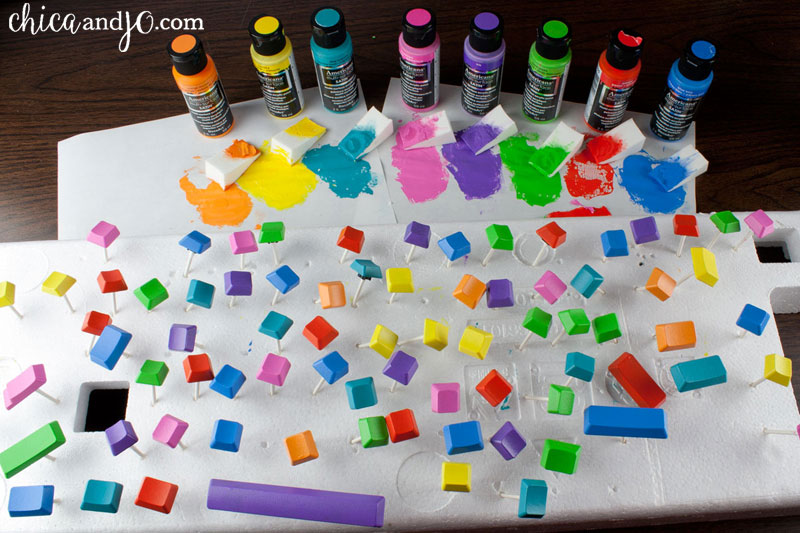
I picked out a set of my favorite bright colors: Canary, Flamingo, Deep Turquoise, Orange Sherbet, Poppy, Apple Green, Blue Bird, and Iris.
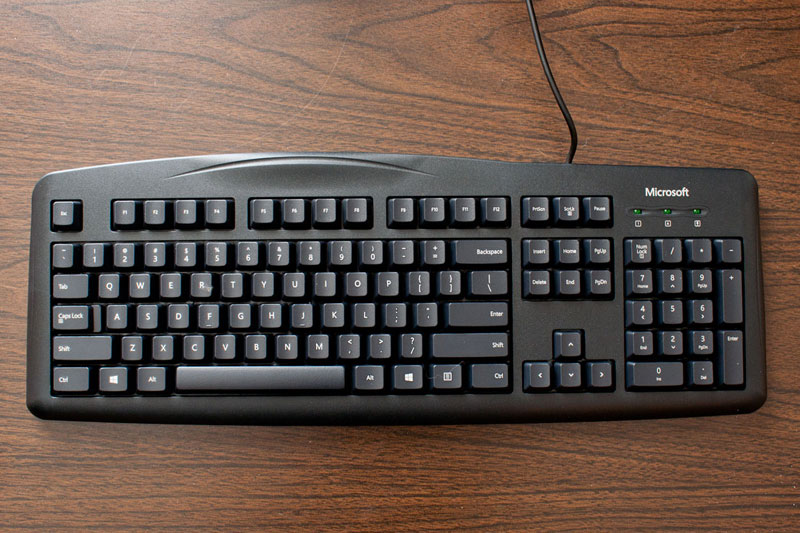
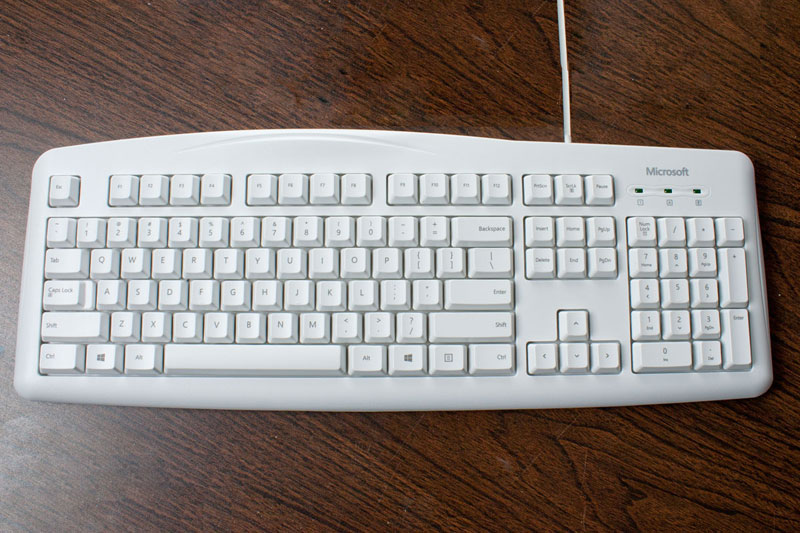
Then I picked out a keyboard. I needed something simple, basic, and inexpensive. I found the perfect match with the Microsoft Wired Keyboard 200 for Business, which has a minimal design, comes in black and white, and is very affordable. It also had the benefit of having the letters printed on flat, rather than raised. You don't want raised letters, or else they will show after you paint the keys.
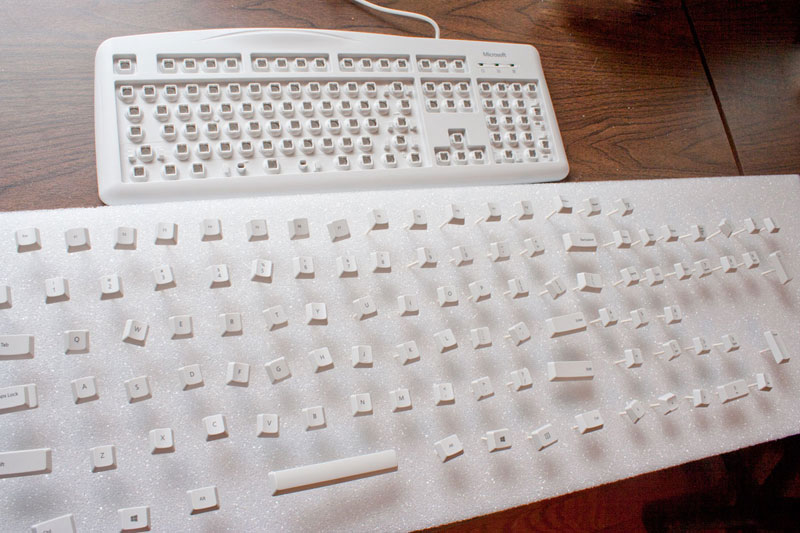
The first thing I did before I started messing with the keyboard was to take a picture of it and print it out. This was going to be a vital reference point later on in this project!

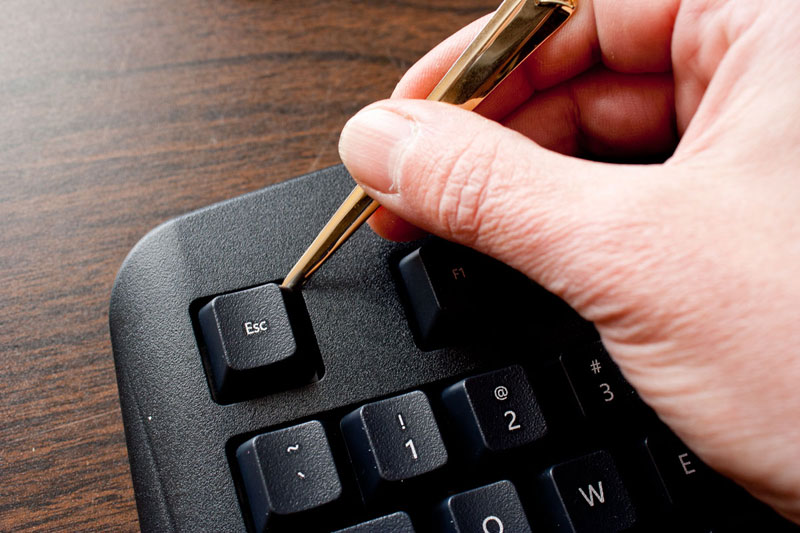
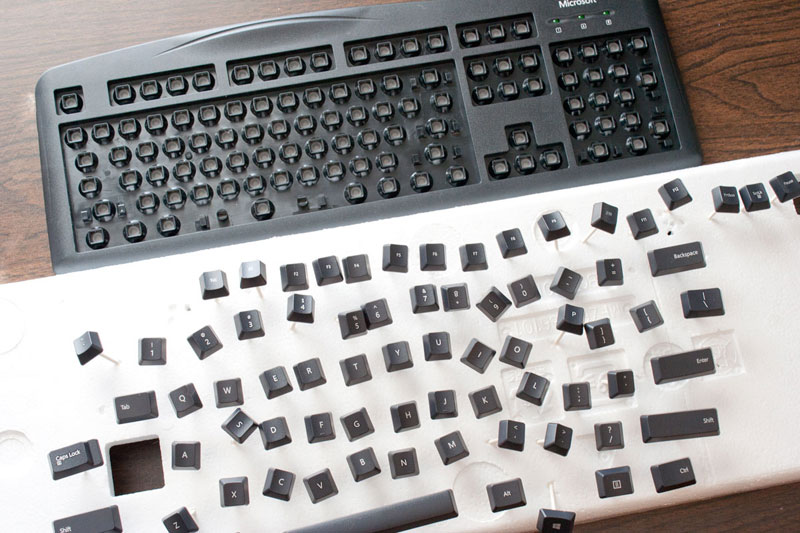
Next I began the task of removing all of the keys from the keyboard. I used a thin letter opener to pry them off, but you can use anything flat that you can get up under the keys.
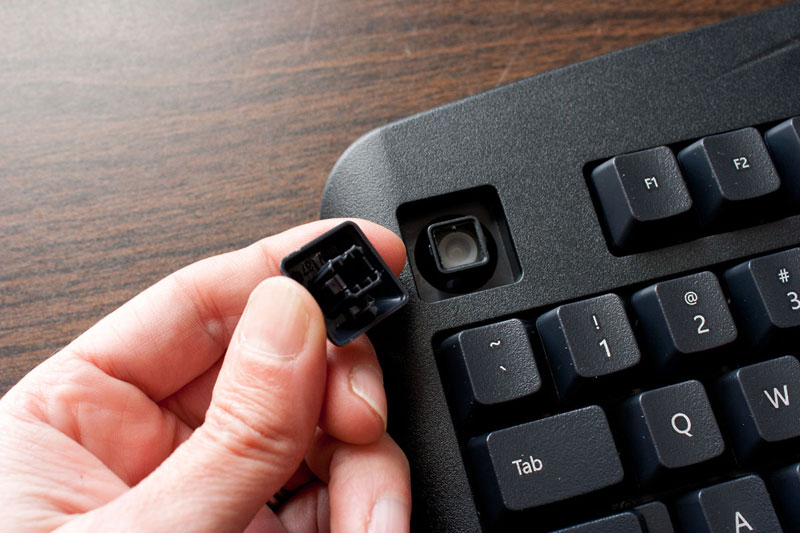
Every type of keyboard is going to be a little different, but the keys on this kind have a little square cavity on the back that hold them in place.
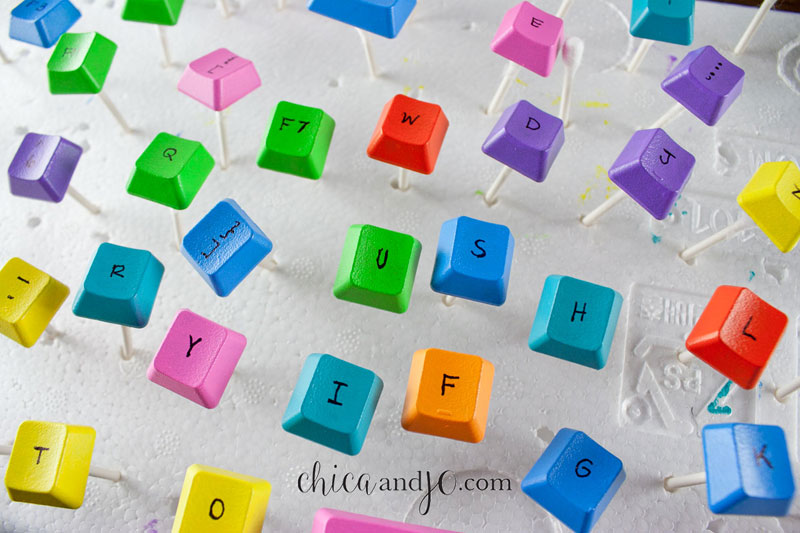
I needed to come up with a way to prop the keys up to dry after I painted them, so I got to thinking about what I could put in that little square cavity. I'm not sure where the idea hit me, but I realized that the cushy end of a Q-tip would be perfect! I cut some Q-tips in half because I only needed the fuzz on one end.
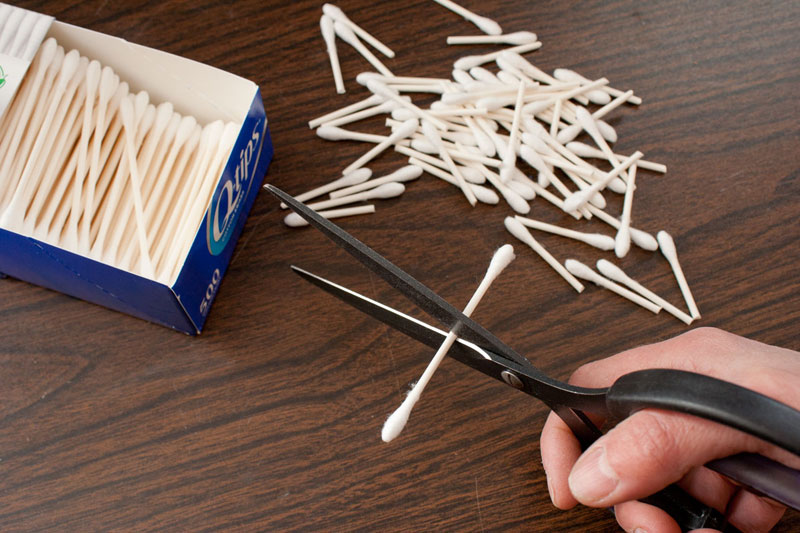
Then I stuck one half into each key. It fit snugly and made a perfect little handle.
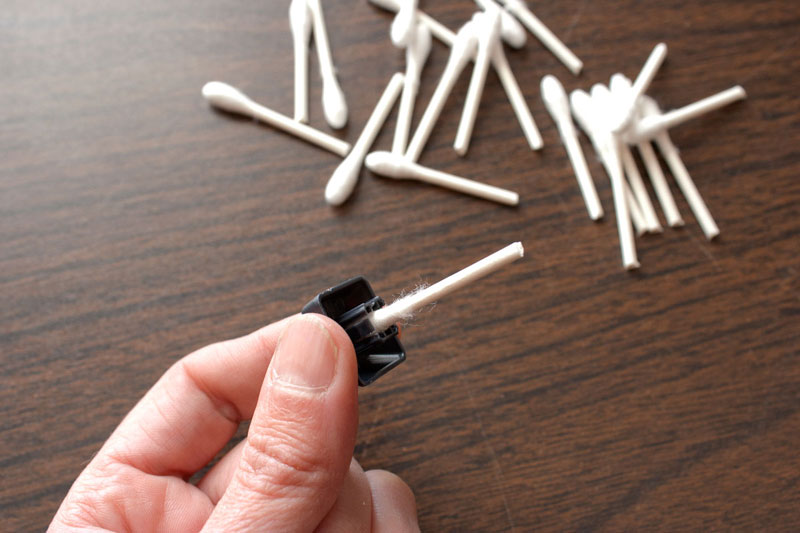
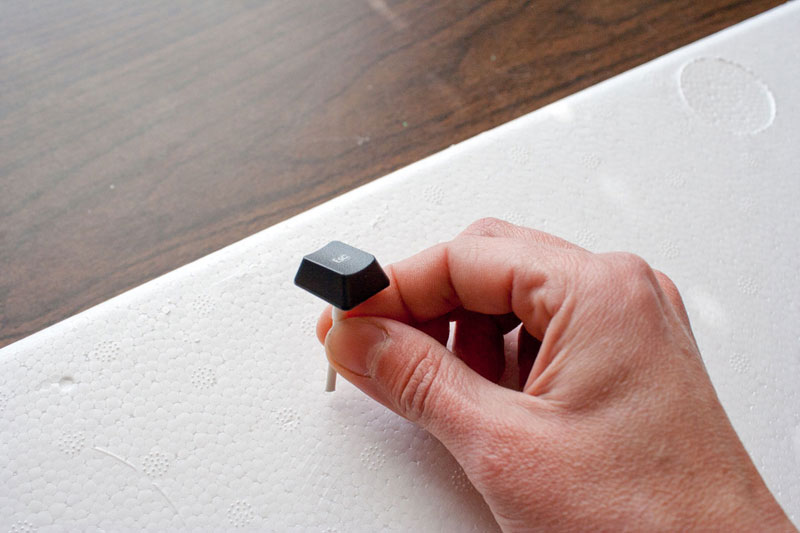
Then I just stuck each one into a chunk of foam I had left over from the packaging on some electronics.
I sort of put the keys in order, but didn't worry about it too much because I knew I was going to be painting randomly with different colors and it didn't matter.
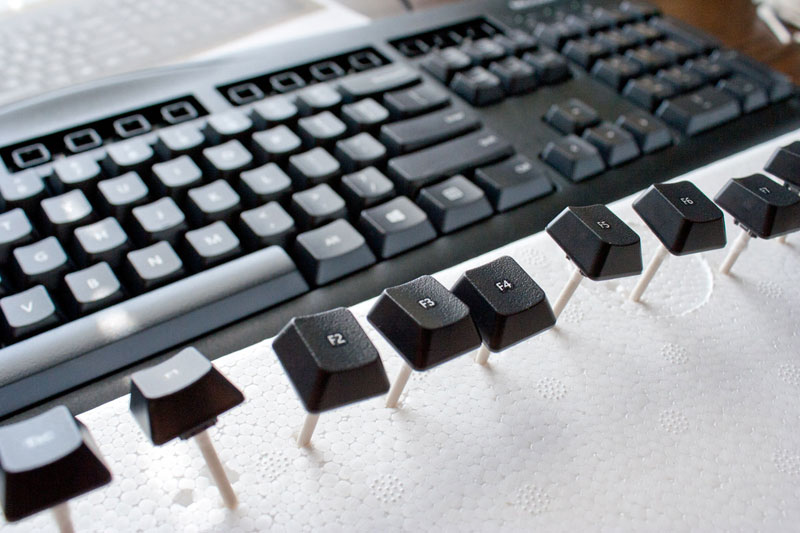
As I did this, I made note of the fact that most of the keys were the same size, but some were different sizes, like the Shift, Tab, Enter, and Backspace key.
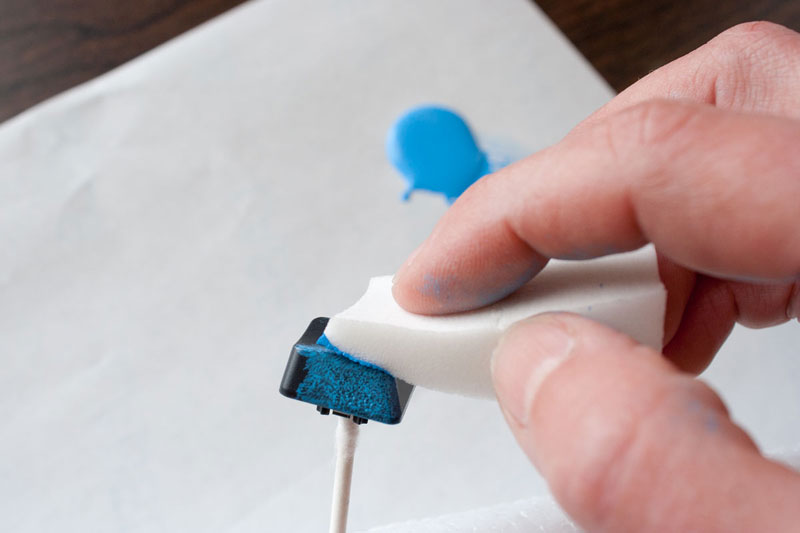
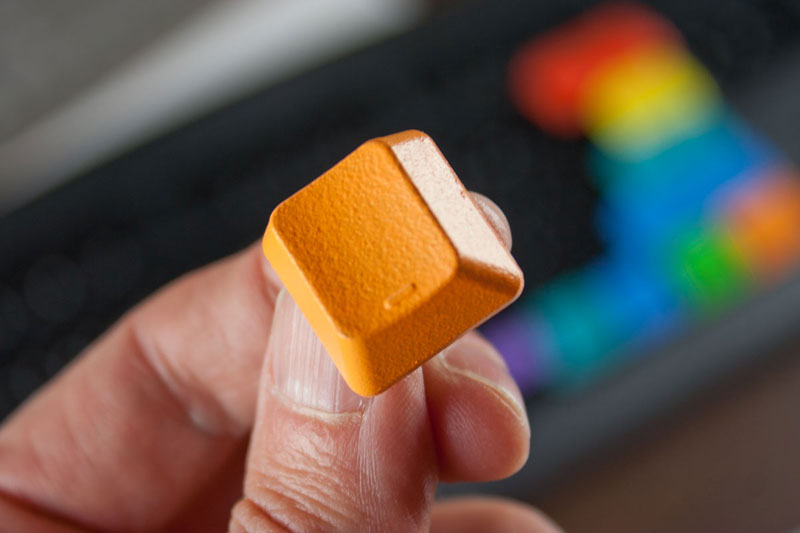
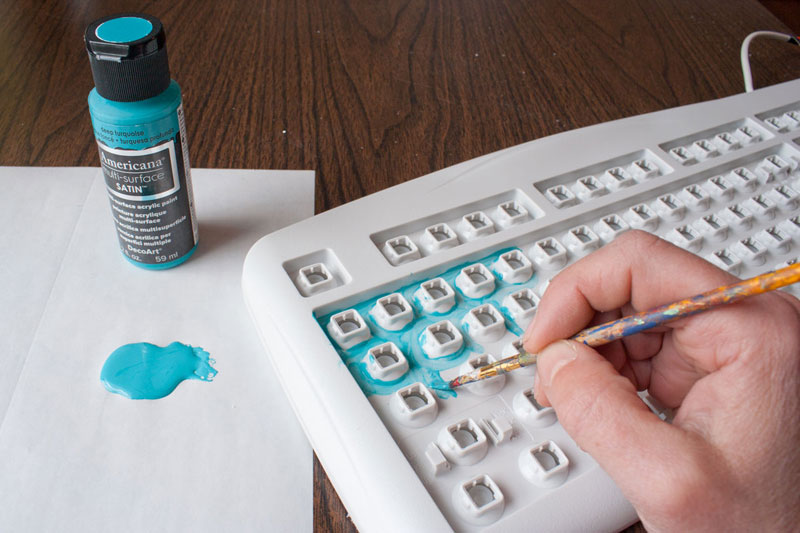
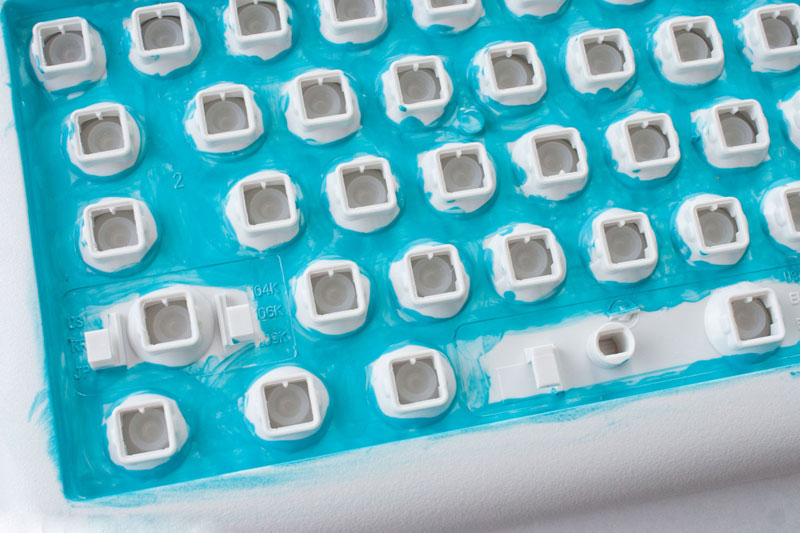
Then it was time to start painting! To get a nice, smooth finish, I used a cosmetic wedge to gently dab some of the paint onto the key. I only applied a very thin coat, so that no blobs or brushstrokes would appear. These wedges do a great job of making an even coat.
Since I was going to use 8 colors in all, I painted roughly 1/8 of the keys with this first color.
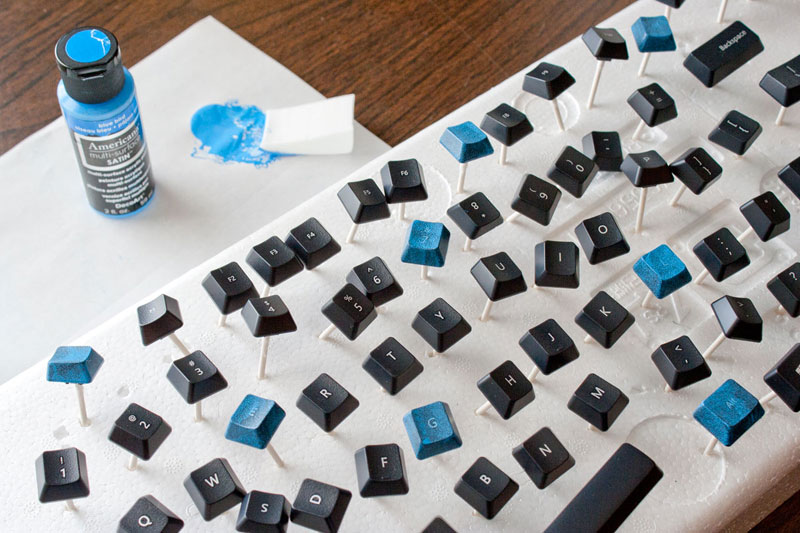
Then I moved on to the other colors, painting about the same number of keys with each color. I made sure to pay attention to those larger keys and was careful not to use the same color on two that were going to be next to each other, like the Shift and Enter keys.
This paint dries pretty quickly, so by the time I was done with the first coat of all the colors, I was able to start over again with another coat. I kept on applying thin coats until I got the opacity I was looking for. Some colors (like the yellow) took more coats than others (like the purple).
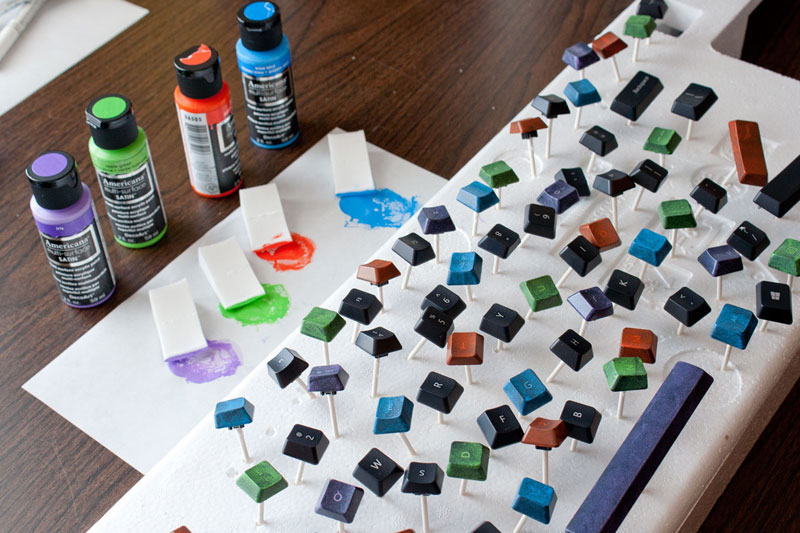
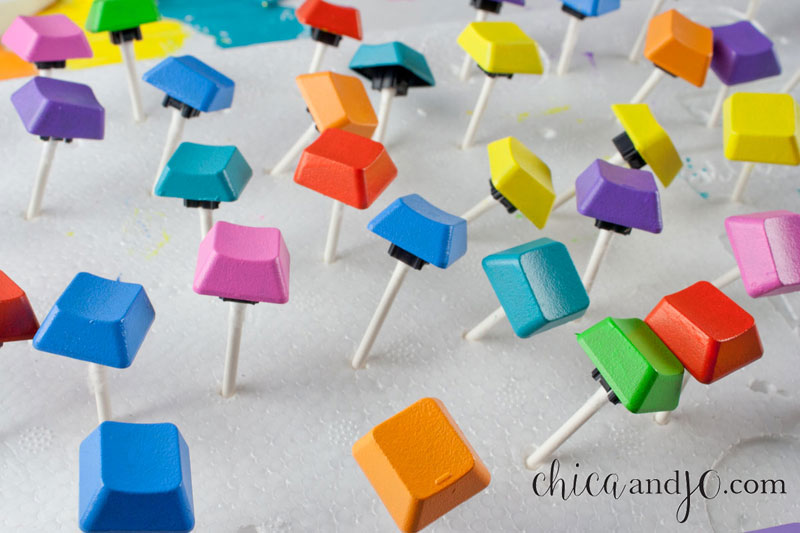
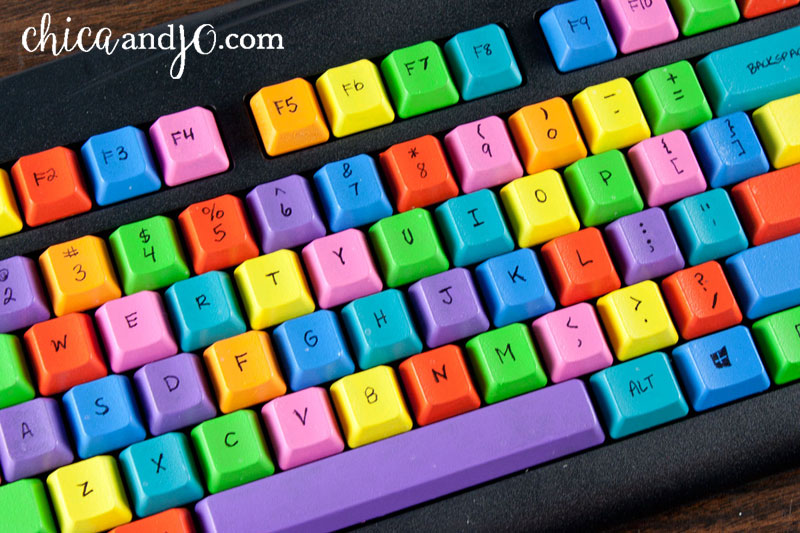
Don't you just love this army of brightly-colored keys?
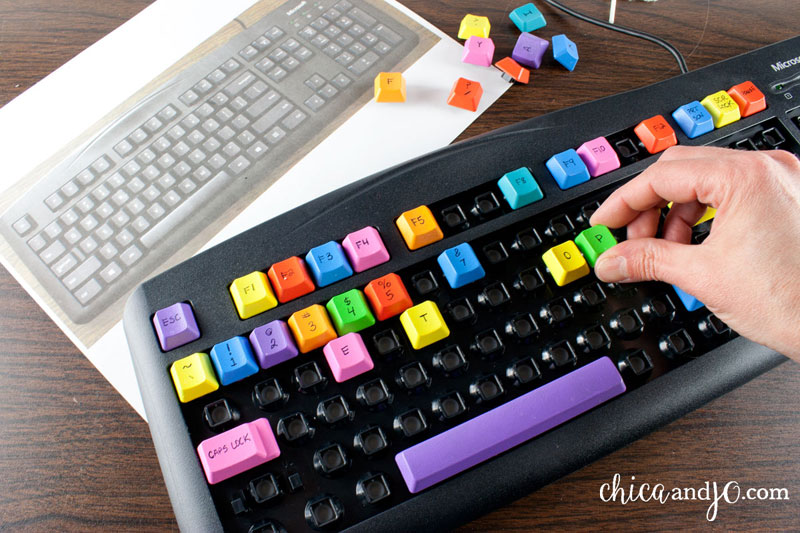
Of course, I'd covered up the letters on these keys, and I needed to fix that. But rather than just go willy-nilly writing them on, I stopped to do some careful arranging first. I referenced my photo and started putting the keys back on the keyboard, carefully setting them there WITHOUT pushing them down in place. I started with the bigger keys, and made sure I had a good color distribution.
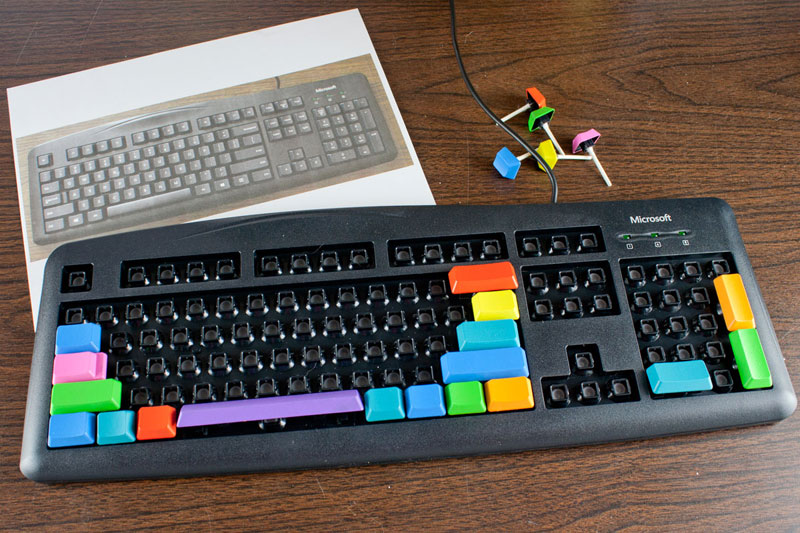
Then I looked through the smaller keys and found the three with the little sensory bumps on them. If you've never noticed, most keyboards have little bumps on the F and J, to help touch typists find "home row" without looking. If your keyboard has a keypad on the side, like mine does, there will also be a bump on the 5 key.
You want to make sure to put these three keys back in the proper place on the keyboard.
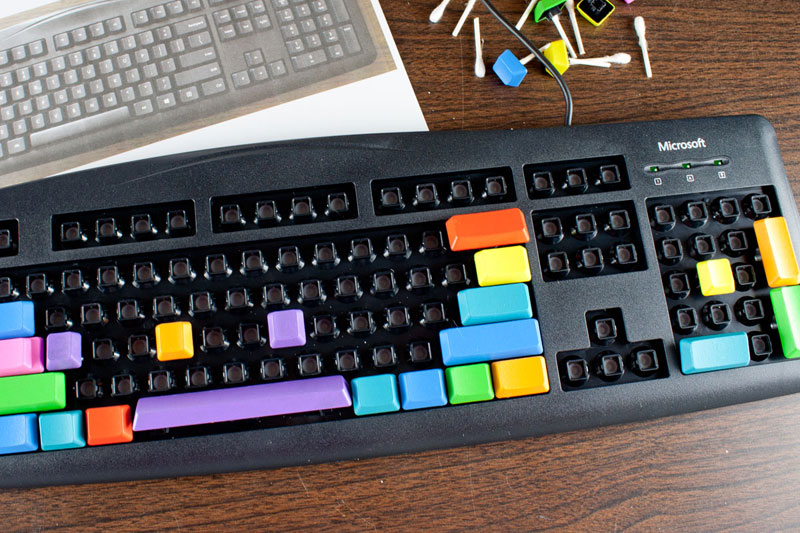
Then I filled in the remaining spots with the regular keys, again NOT pushing them down, but just setting them there gently. I took time to distribute the colors around evenly and get a look I was happy with.
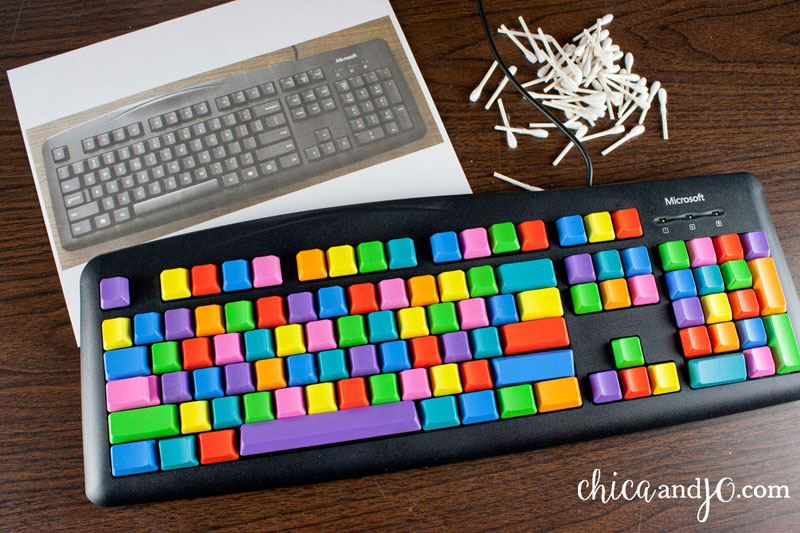
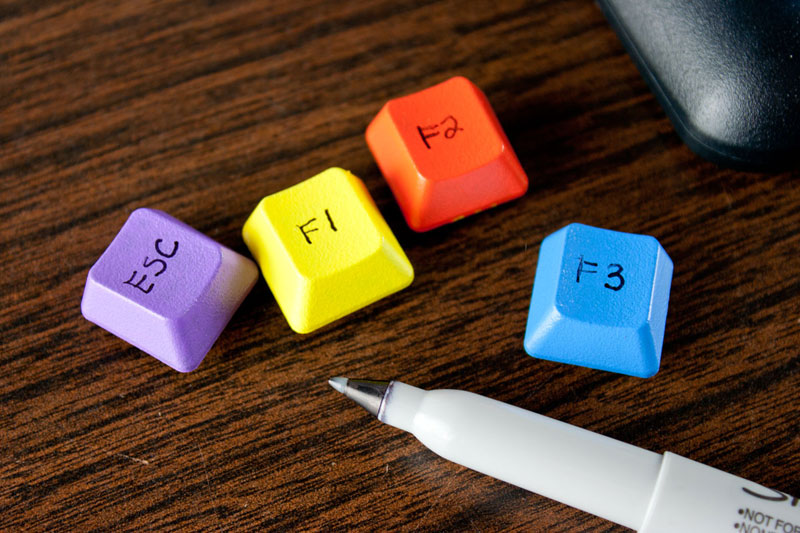
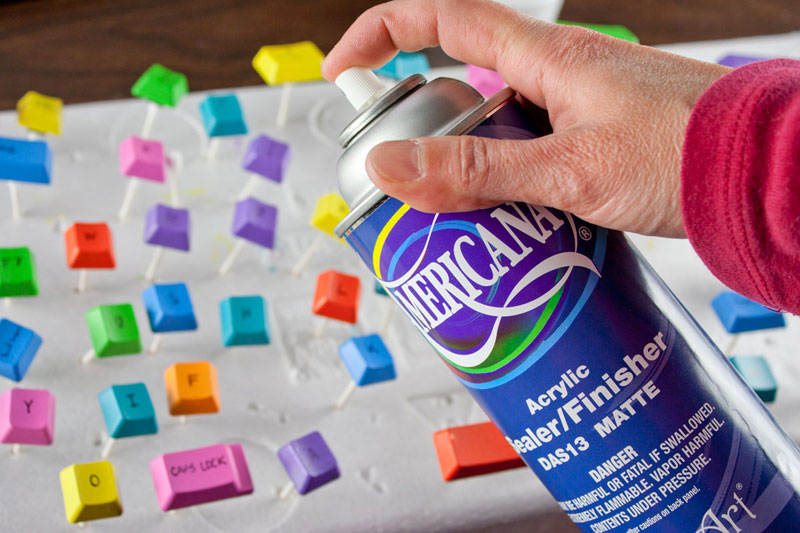
Finally I was set and ready to write the letters on. I took the keys off, one by one, referenced my photo carefully, and used a fine-tip black Sharpie to write the appropriate letter/word on each one.
The Multi-Surface paint itself has a lovely satin finish that doesn't require any sort of sealer, but I was worried about the Sharpie wearing off with repeated use, so I put all the keys back on their Q-tip pegs and gave them a couple light coats of Americana Sealer/Finish matte spray for good measure. Be careful not to put too heavy of a coat, though, as that may cause the paint to crackle.
Then all that was left was to stick the keys back in place, pushing them down for good this time.
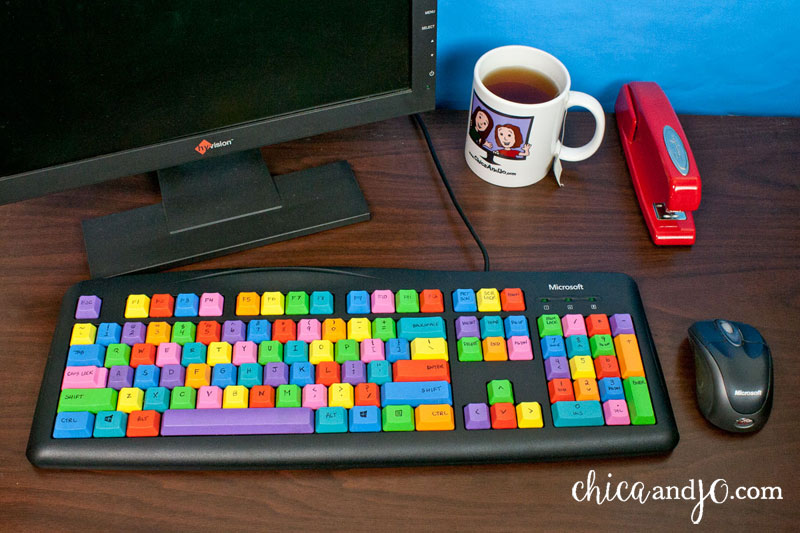
Just look how cool the result is. Can you even believe it?
I am completely in love with this keyboard and how lovely it looks on my desk at work!
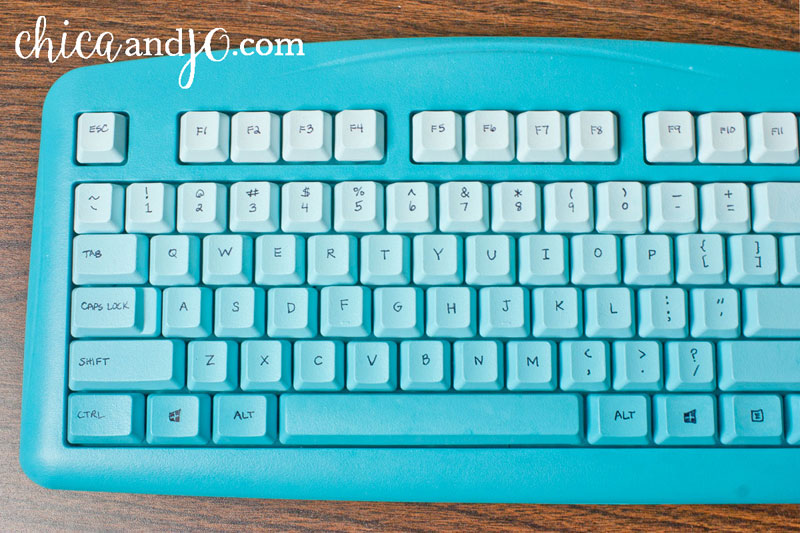
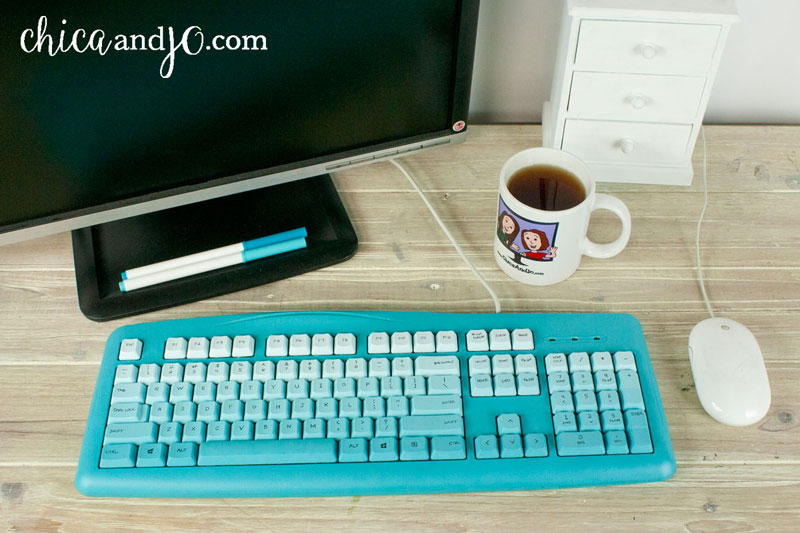
The possibilities with this technique are endless. I was flooded with ideas for color combinations, and I decided to make another keyboard for my desk at home. This time I focused on a color I've been fascinated with lately (turquoise) and a trend that everyone loves — ombré!
Once again I went with the perfectly-suited Microsoft Wired Keyboard 200 for Business, but this time I got white so that it would be easier to cover.
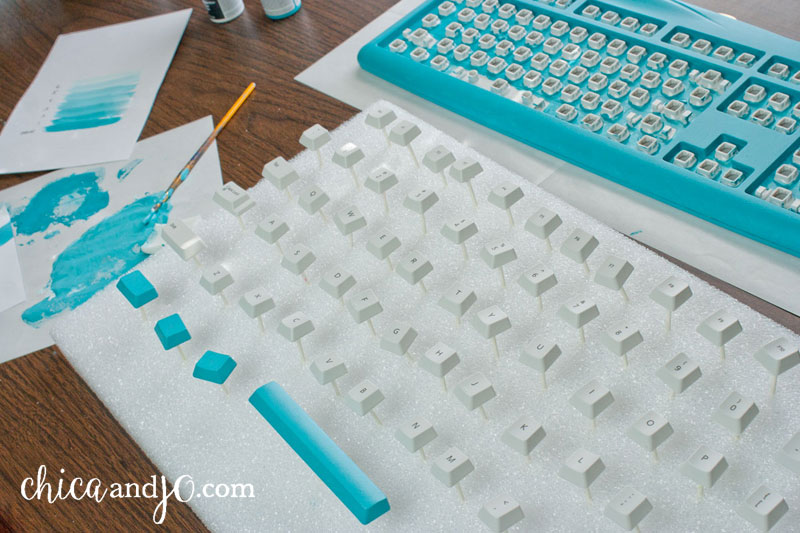
To accomplish the ombré pattern I wanted, it was critical that I keep the keys in the exact position during the painting this time. So I was very careful to line them up perfectly. I switched from my old chunk of packing foam to a 2"x12"x36" sheet of Styrofoam, which did a better job of holding the keys upright.
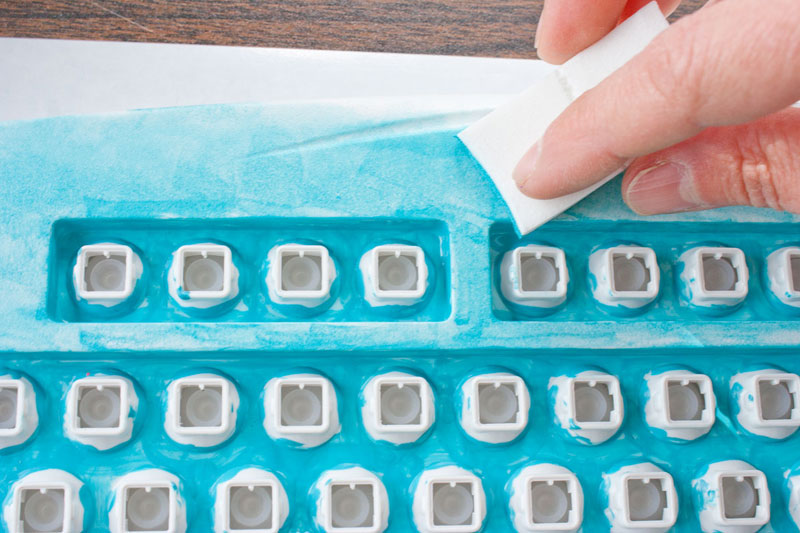
This time I wanted to paint the whole keyboard, not just the keys. I started by painting the area under where the keys go, just using straight Deep Turquoise.
Since the keys would end up covering most of the area, I didn't have to be too neat, and I didn't have to cover it all. I just needed to establish a good background color.
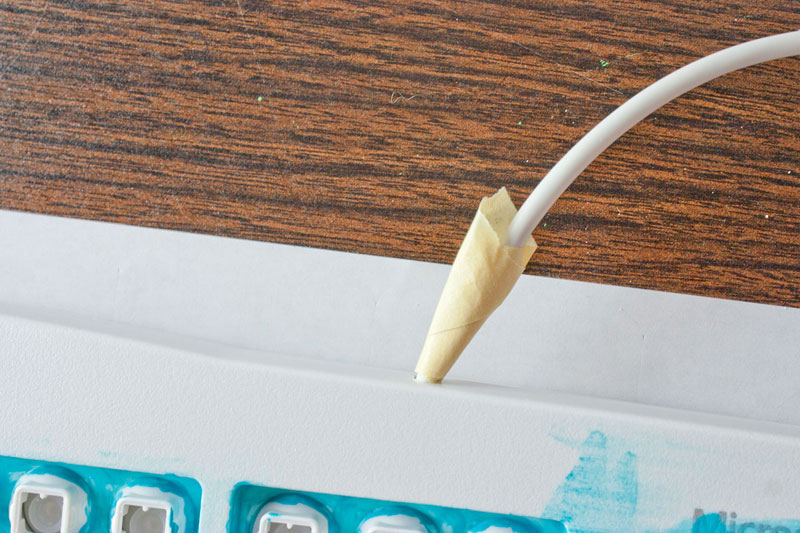
I used some masking tape to protect the cord from paint.
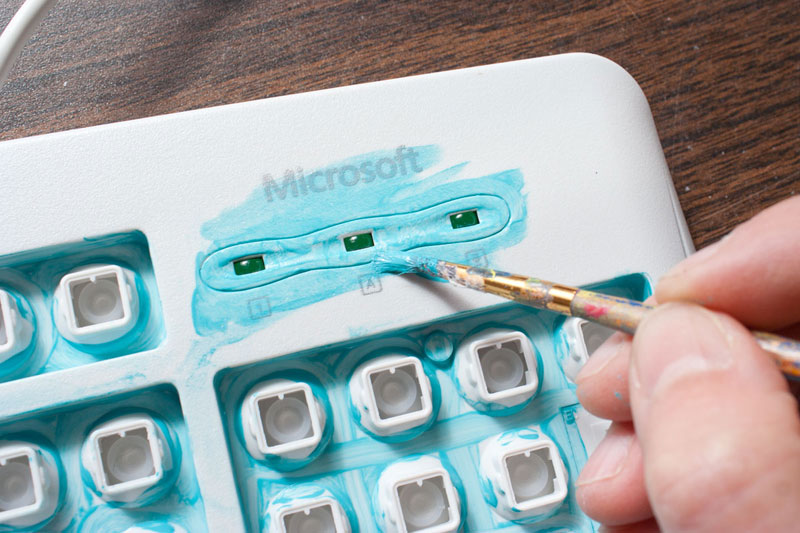
I used a small brush to paint around the little lights on the corner of the keyboard.
Then I grabbed another cosmetic wedge and applied the Deep Turquoise to the rest of the keyboard.
I kept adding coats of color until I got the coverage I wanted.

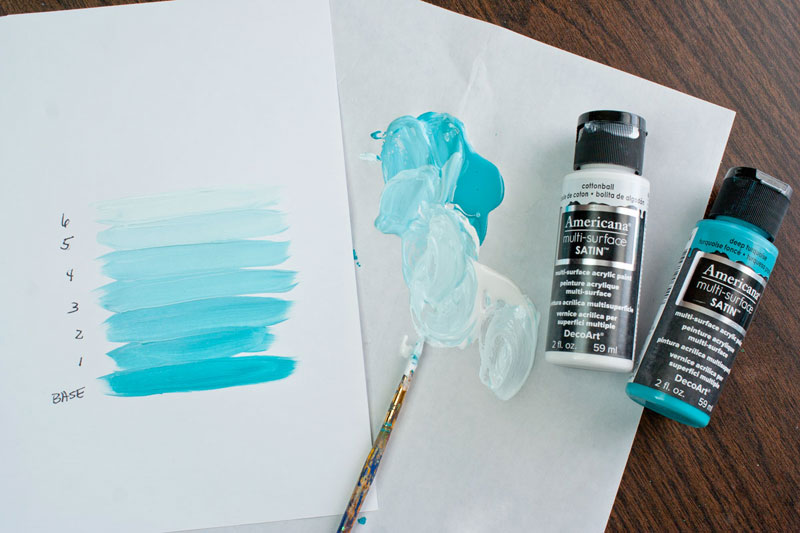
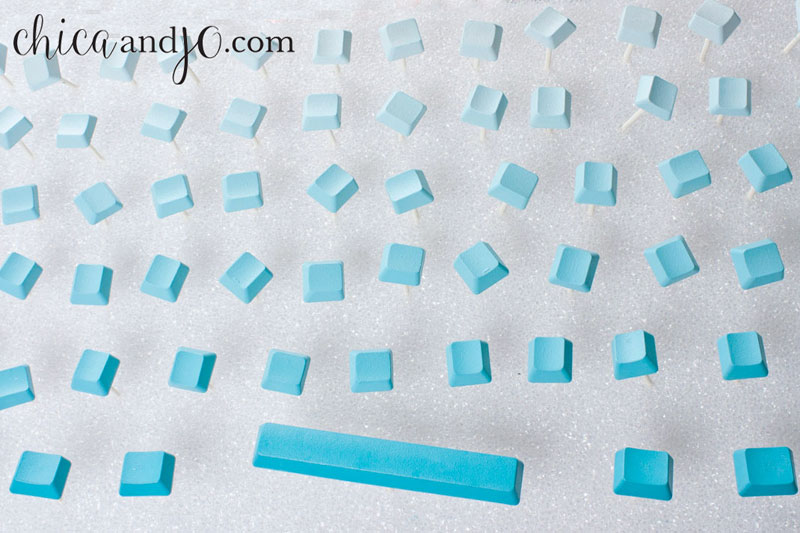
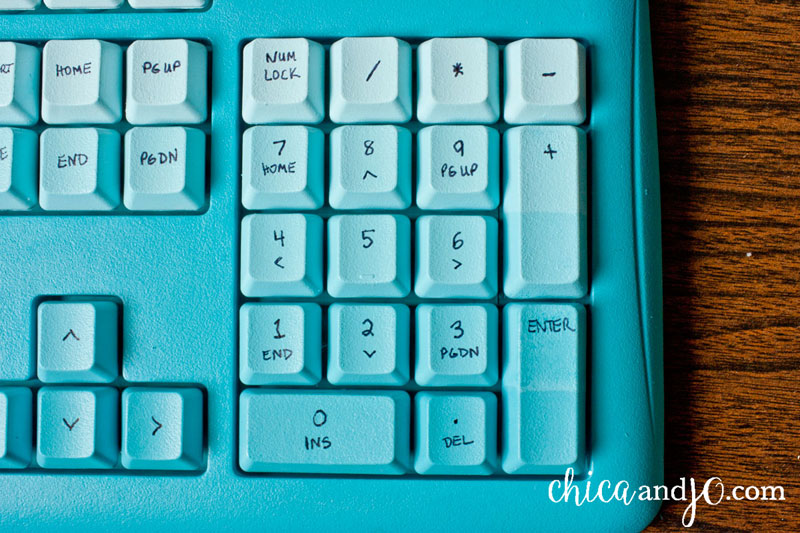
At last, it was time to work on the ombré. I wanted to make each row of keys a different color, so I knew I would need 6 shades of turquoise. I decided to play with the colors a little on scrap paper first, so that I had a good reference point. I just mixed a little more Cottonball in with the Deep Turquoise to achieve each shade.
Then I used the same technique as before to apply paint to the keys with the cosmetic wedge. I started with my darkest shade, which I put on all the keys on the bottom row.
Then I moved up, row by row, using the lighter shades, finishing with the lightest at the top. I found the white keys a LOT easier to cover with paint than the black keys were, especially for the light colors!
Then I wrote the letters on, and sealed the keys like before.
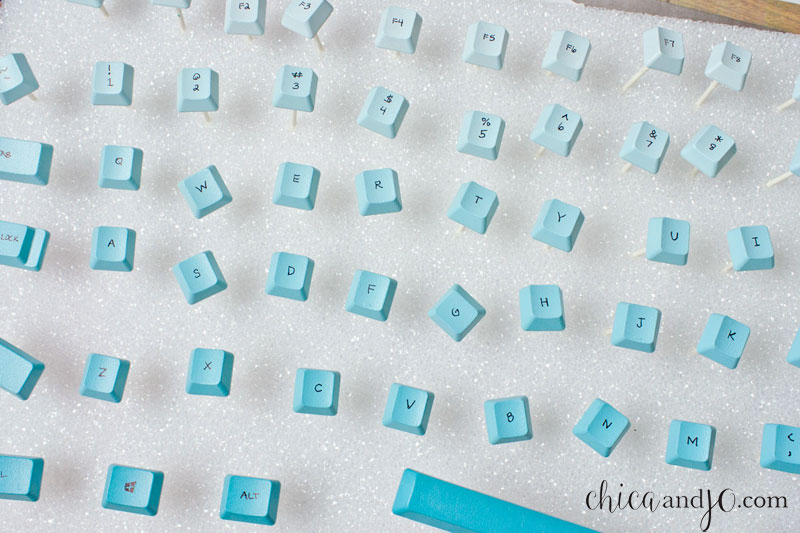
When the keys were dry, I popped them back in place on the keyboard. Fortunately, I could use the same keyboard photo as before, since this white keyboard had the same layout that the black one did.
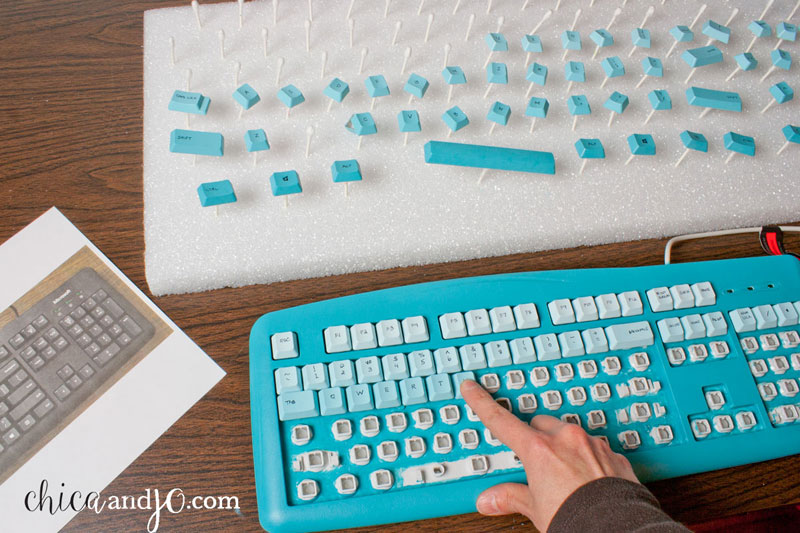
Gee, I thought I loved the first rainbow keyboard, but I might love this one even more! The ombré effect is just what I was aiming for, and the gradation is gradual and perfect.
By the way, there are two keys on this keyboard that actually cross over two rows. When I got to those, I just painted the first color over the whole thing, let it dry, masked it off, and then painted the top with the lighter color. Easy peasy!
The way this keyboard looks on my desk at home is pretty stinking awesome, wouldn't you say?
I already have tons more ideas for other color combinations for more DIY colorful keyboards. I can't wait to make them and share the results with you all!


43 comments so far:
What a cool idea this is!! Great project to do with grandchildren (plastic gloves of course!)..and I had just purchased a keyboard that is black w/yellow keys and huge letters and numbers... Anyways, I am always trying to find projects I can do w/my grandchildren all ten of them!! Ranging from 2yrs old to 18yrs old...thanks for the DIY!!
Magnifique
my keyboard is spattered with so many paint sprays it looks horrible! This is a wonderful idea to clean it up !
Mary, that's a great way to fix it up!
I saw this on boing boing and couldn't believe how easy it is to make a great looking keyboard! I bet this would make for a great family project.
Very, very cool! I might try this, but I'm thinking of using some pre-fab letters, like Letraset or possibly some actual thin plastic stick-on lettering.
Again, very nice, looks really slick!
What a great idea!! My plain black keyboard is so boring!
This is such a good piece of art. I don't know how you come up with these ideas! :)
I'm so desperate to do it, but sadly I only own a mac laptop so obviously I can't... unless you can suggest an idea of how to paint computer keys which are backlit? Thanks!
Harrison, I'm glad you like this idea! I personally would be afraid to try painting anything as permanent and expensive as a laptop. If you really want to paint a keyboard, maybe you can make one for a gift for a friend!
LOVE this project! I am going to shamelessly copy, probably in orange ombre...If someone is painting a used keyboard (instead of brand-new clean), clean with rubbing alcohol and let dry to degrease keys so the paint will stick better.
Jennilyn, that's a great tip about cleaning the keys. Thanks for sharing!
Oh man! I love this idea so much I pinned it twice and then came to read the tutorial. I was so excited because the letters on some of my keys on my laptop have rubbed off and I've been wanting to fix that somehow...so I got all excited when I saw this tutorial and then it came...my DUH! moment. I looked down at my computer and remembered I have a laptop! LOL I don't know if I can do this with they keys on here, but I am going to investigate a bit more and with any luck I can. Thanks for sharing. :)
Deb, so glad you love this idea! You COULD paint keyboard keys, but I'm not sure I would recommend it, because if something goes wrong, it would be very expensive to buy replacement keys for the laptop. I suggest trying on an inexpensive corded keyboard first, to get some practice and see if you like the technique. If you can't use the keyboard yourself, it would make a great gift!
Can you use regular acrylic paints instead of the ones your used and then put the matte finish? I really want to do this but I want to be sure the paint will work.
Kristy, the key is choosing a paint that sticks well to plastic, and the Americana Multi-Surface paints fit the bill amazingly. If you want to try to use a different paint, I suggest testing on keys from an old keyboard first.
I LOVE your keyboards! When I have a day of patience I sure will do this too! TFS!
I wonder how this is holding up. I am going to do it this weekend but wondered how the ware and tear was going? I am gong to do a combo of both, the ombre and the colorful I am going to do ombre from left to right but each horizontal row a different color (f's will be red, #'s will be orange, qwerty will be yellow etc). if you email me I'll email you back my before, steps and after pics so you can add them here. =) I am SO excited!
AmyBeth, the paint is holding up beautifully on both keyboards. The marker lettering is fading a little on one of them, but I'm not sure if it's because of use or because it's near a window. I am planning to touch it up soon. I love the rainbow ombre idea and can't wait to see your pictures! Email them to us at chicaandjo@chicaandjo.com
So awesome and you used my favorite color!
For Deb B the laptop question.... I wouldn't recommend painting the laptop keyboard but you can use washi tape to decorate it. Most washi tape is transparent enough where you don't have to write on it unless you get one with a big dark design. They come in all colors & designs. Just a thought & alternative for you.
Oh yeah! Chica I LOVE LOVE the ombre! I'm going to do this with my keyboard @work on Orange!
Awesome idea!!! Does the paint for the letters stay? I did that once and it faded pretty quickly... :( Maybe it was the wrong pen. Which one did you use?
Ella, the colorful paint is holding up great on the keys. The hand-written lettering, which was done with a black Sharpie, is starting to fade a little on the more frequently-used keys. Should be a breeze to touch up, though.
Great project! You might use a Sharpie paint pen rather than a regular Sharpie, as it is much more durable.
Jeanne, thanks for the nice comments and for the tip!
Many thanks for this tip: I used this to jazz up some function keys on an old keyboard and it worked a treat. As a little tip, you can get an 8-pot mini sampler of many of the colours used: which does allow you to experiment without too great an expense.
My wife did worry as to why I was ordering cosmetic wedges, mind you...
Chris, thanks for the tip. And funny story about your wife!
Wonderful project! It is now on my list of things to do. I don't use my desk top much any more, but have several keyboards for it. I already know the person that is getting the first one as a gift. All the tips and tricks were great as well. Now to create my designs and order the colors and supplies. Thank you! It has been a rough day and you have truly brightened it.
Susan, thanks for the nice words. Let us know how your keyboards come out!
I love this idea! Im doing a purple ombre on mine using leftover paint from samples at lowes. I hope it sticks to the plastic nicely. Did you also spray the base with the sealer too? Thanks for sharing this amazing idea!!
Nikki, let us know how the paint sticks to the plastic. I did not spray the base with sealer, because I was only worried about the keys possibly wearing away from touching them so much.
I want to do this on my laptop, just the keys. i dont know how id take them out since once theyre out they dont go back.
Emmett, I don't really recommend that you do this on a laptop, because laptop keyboards are awfully expensive to replace if something goes wrong. And not being able to paint each key separately makes it way more difficult.
My! This is beautiful! You've done it up so well! I was looking for colour keyboards to buy and google got me here and now I feel why buy, hell I will make it!!! And your creation is my blueprint! Thanks for explaining in such detail! You're amazing!!!
Arti, I'm happy I inspired you to make your own. Enjoy!
This came at the perfect time and will save me about $40 as well. Thank you for the step by step instructions and the photos illustrating how to do the project!
Sylvia, happy to help! This is such a fun project and makes such a conversation piece!
Brilliant! How does the paint withstand the test of time?
frd, I've found that the paint withstands usage wonderfully. The marker did wear off some keys after a while, though, but I just redid them.
Thanks very much for the inspiration to give this a go. I've just finished the painting and about to do the inking...I wish I could push "Save" first. ;^) Did you ever think you would still be getting comments on your design so many years later?
I'm happy to hear that the paint withstands usage.
Have you tried spray painting it on?
Mike, we're so glad we inspired you! Oh, if only more things in life had a "save" button. :) I have not tried spray paint. The key to this project is to keep the paint as thin as possible, while still adhering to the plastic, so the multi-surface paint seemed like the best choice to me. Good luck with your inking!
Hola buena idea, pero me gustaría una técnica para teñirlas y no pintadas.
Alguien pudiera ayudarme o asesorame y recomendarme un tinte que se adhiera al plástico?
Gracias
I love this!!!